
Piggyback perm | How to roll a piggyback spiral perm | Cost | Products


A perm is a chemical treatment that changes your hair’s texture for several months. Most perms create curls and waves, but some can also straighten naturally curly hair. The technique uses special solutions to break and reform the bonds in your hair, creating a new shape that lasts.
A piggyback perm is a specific perming technique designed for very long hair—usually reaching the waist or longer. This method uses two rods per section of hair instead of one. You can do this perm at home with a perming kit yourself, though it takes patience and practice.
| Photo | Popular Hair Product | Price |
|---|---|---|

|
Kkioor 24 Inch Chocolate Brown Human Hair Wig 200 Density Body Wave Lace Front Wigs Human Hair Pre Plucked 13X4 HD Frontal Wig 4# Colored Brown Wig For Women Glueless Wigs | Check Price On Amazon |

|
KingSup 613 Lace Front Wig Human Hair Pre Plucked 250 Density 26 Inch 5x5 HD Lace Closure Straight Blonde Wig Human Hair, 100% Real Human Hair without Synthetic Blend Tangle Free Triple Lifespan 3X | Check Price On Amazon |
|
WIGCHIC 16" Kinky Curly Half Wig Human Hair Burgundy & Dark Roots | Flip-Over Drawstring | Seamless 4C Hairline | True Length | 3-in-1 Styling | Beginner Friendly (T1B/99J) | Check Price On Amazon |

|
Hair Removal Cream for Men & Women: Painless Depilatory for Sensitive Skin & Intimate Areas, Moisturizing with Aloe Vera & Vitamin E, Safe for Face, Underarms, Bikini, Arms (3.7 Fl Oz (Pack of 2)) | Check Price On Amazon |
|
ZOOLY PROFESSIONAL Ginger Shampoo and Conditioner Sets 20.3 Fl Oz- Anti Hair Loss and Nourishes Hair Roots, Salon Level Scalp Care for Men and Women | Check Price On Amazon |

|
LUSN Baby Hair Clippers with Vacuum, Quiet Hair Trimmers for Kids, IPX7 Waterproof Rechargeable Cordless Haircut Kit for Baby Children Infant | Check Price On Amazon |
|
LURA Dual Voltage Travel Hair Dryer with Diffuser,Travel Blow Dryer Mini with EU Plug and UK Plug,Lightweight Portable Hairdryers with Folding Handle,1200W Compact Small Blowdryers for Women | Check Price On Amazon |
What Is a Piggyback Perm?
A piggyback perm uses a double-rod technique to create even, consistent curls on long hair. When hair extends past your shoulders, a single perming rod cannot hold all the hair evenly. This causes uneven curl patterns—tight curls at the ends and loose waves at the roots.
The piggyback method solves this problem by stacking two rods on each section of hair. The first rod wraps the middle and ends of the hair. The second rod “piggybacks” onto the first, wrapping the hair closer to the roots. This creates uniform curls from root to tip.
Your stylist divides your hair into 5 to 6 sections. Each section gets two rods—one at the base and one at the ends. The result is smooth, even curls that look natural and bouncy.
Why Use Two Rods Instead of One?
Long hair has more weight and length to wrap around a single rod. When you use only one rod, the hair near your scalp gets stretched, while the ends get tightly coiled. This creates an unbalanced look.
Using two rods distributes the hair more evenly. The base rod controls the curl near your roots. The end rod shapes the curl at your tips. Both work together to create a consistent spiral from top to bottom.
Who Should Get a Piggyback Perm?
This perm works best for people with:
- Hair that reaches the waist or longer
- Straight or slightly wavy hair that holds curls well
- Healthy hair without excessive damage or breakage
- Patience for a longer salon visit (this technique takes more time)
If your hair is shorter than shoulder-length, other forms of perm will work better for your length.
Piggyback Perm vs. Spiral Perm: Key Differences
Both piggyback and spiral perms create curls, but they use different techniques and produce different results.
Spiral Perm
A spiral perm creates tight, spring-like curls that spiral down the hair shaft. Stylists use long, thin rods placed vertically in the hair. Each strand wraps around the rod in a spiral pattern, creating a corkscrew effect.
This perm works best on hair at least eight inches long. The curls look dramatic and defined, but they can appear less natural because of the tightness. Spiral perms require many rods—sometimes 40 or more—making the process time-consuming.
The curling rods are set vertically in the hair, and each strand overlaps the previous one. This creates uniform spirals throughout the entire head.
Piggyback Perm
A piggyback perm uses two rods per section instead of wrapping each strand individually. Half of the hair wraps around the first rod in a spiral pattern. The other half wraps around the second rod in a traditional horizontal style.
This combination creates softer, more natural-looking curls. The curls have more volume and movement compared to spiral perms. The piggyback method also reduces processing time because you work with larger sections of hair.
Comparison Table
| Feature | Piggyback Perm | Spiral Perm |
|---|---|---|
| Rod Placement | Two rods per section, horizontal | One rod per strand, vertical |
| Curl Type | Soft, natural waves and curls | Tight, defined corkscrew curls |
| Best Hair Length | Waist-length or longer | 8 inches or longer |
| Processing Time | Moderate (fewer sections) | Long (many individual rods) |
| Curl Consistency | Even from root to tip | Uniform spirals, can be uneven on very long hair |
| Maintenance | Moderate, requires curl cream and diffusing | High, needs regular styling to prevent frizz |
Popular Types of Piggyback Perms
Piggyback perms vary based on hair length and the size of the rods used. Here are the most common types.
1. Piggyback Perm for Long Hair
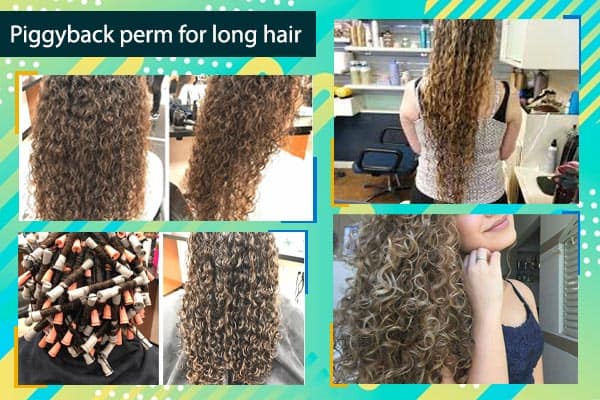
Long hair requires careful sectioning and rod placement. Your stylist divides your hair into 5 to 6 large sections, then subdivides each section into smaller parts. Each small section gets two rods—one small rod at the base near the scalp, and one larger rod at the ends.
The front sections are rolled first to ensure even processing time. The wrapping process takes longer with long hair because there is more length to work with. Expect to spend 3 to 4 hours in the salon for this perm.
The result is soft, voluminous curls that start near the roots and continue evenly to the tips.
2. Piggyback Perm for Short Hair
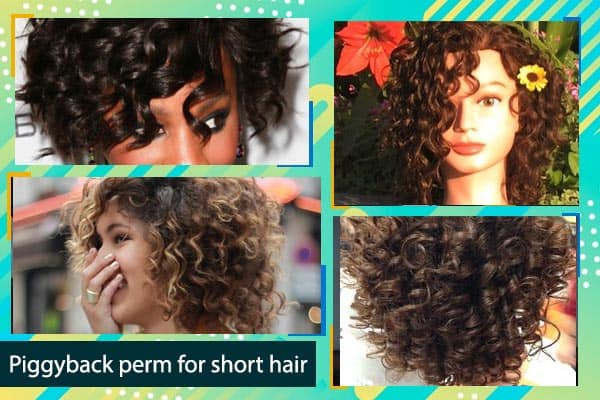
Piggyback perms are not ideal for short hair. If your hair is shoulder-length or shorter, there is not enough length to wrap around two rods. The technique will not create the even curls it is designed for.
For shorter hair, consider other perm styles like body wave perms, root perms, or standard spiral perms. These techniques work better with less length and still create beautiful curls.
3. Loose Piggyback Perm
A loose piggyback perm uses larger rods to create soft, beachy waves instead of tight curls. This style looks relaxed and natural. It is perfect for people who want volume and movement without dramatic curls.
Your stylist uses jumbo-sized rods for both the base and the ends. The perm solution is applied more lightly to avoid over-processing. The result is loose, flowing waves that last for months.
4. Tight Piggyback Perm
A tight piggyback perm uses smaller rods to create defined, bouncy curls. This style works well for people with thick, coarse hair that can handle more structure.
Smaller rods create tighter curls that hold their shape longer. However, tight curls require more maintenance and styling products to prevent frizz and dryness.
How to Do a Piggyback Perm: Step-by-Step Guide
Performing a piggyback perm requires time, patience, and the right tools. Follow these steps carefully to achieve even, beautiful curls.
What You Need
- Perm rods (two different sizes per section)
- Perm solution (matched to your hair type)
- Neutralizer
- End papers or wraps
- Rat tail comb for sectioning
- Hair clips to hold sections
- Plastic cape or towel
- Timer
- Gloves to protect your hands
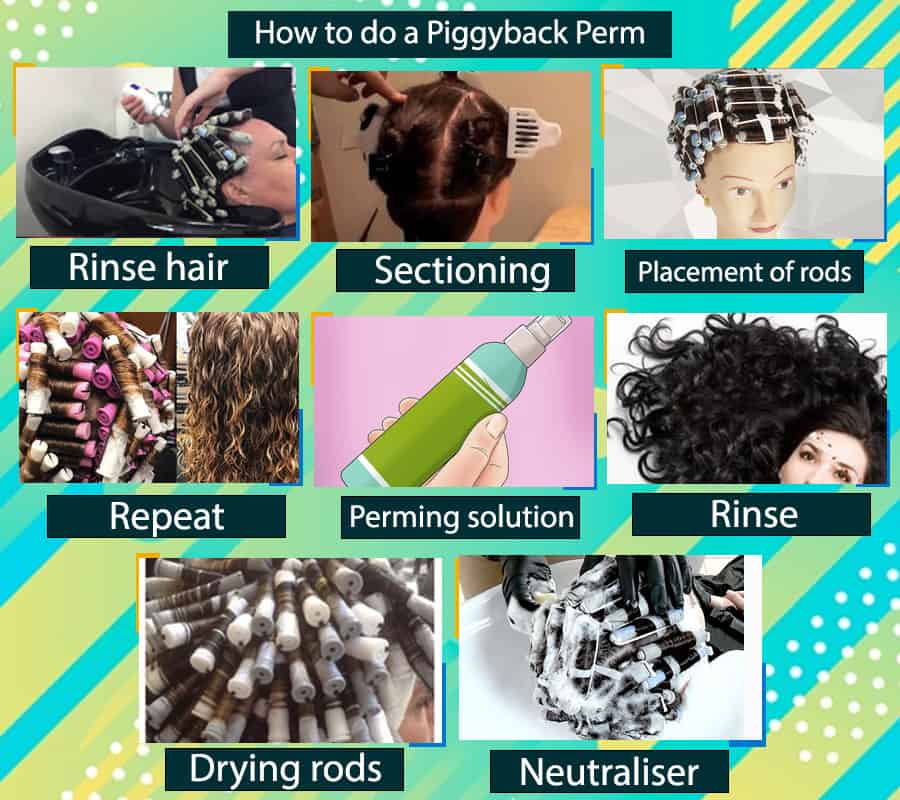
Step 1: Rinse and Prepare Hair
Start with clean, damp hair. Wash your hair with a clarifying shampoo to remove any buildup, oils, or styling products. Do not use conditioner—it can create a barrier that blocks the perm solution.
Towel-dry your hair until it is damp but not dripping. Use a wide-toothed comb to gently detangle your hair from ends to roots. Remove all knots and tangles before you begin sectioning.
Step 2: Section Your Hair
Divide your hair into 5 to 6 large sections. Use your rat tail comb to create clean, even parts. Clip each section to keep it separated.
Start with the top section of your head. This area processes first and sets the tone for the rest of your perm.
Step 3: Wrap the First Rod (Base Rod)
Take a small subsection from one of your main sections. The subsection should be no wider than the length of your perm rod.
Place an end paper at the tips of your hair. This protects the ends from damage and helps them wrap smoothly.
Position the first rod (the smaller base rod) about halfway down the length of the hair strand. Wrap the hair around the rod in a spiral motion, rolling toward your scalp. Secure the rod close to your head with the attached fastener.
Step 4: Wrap the Second Rod (End Rod)
Take the remaining length of hair (the ends) and wrap it around the second rod. This rod should be slightly larger than the base rod. Wrap the hair in a horizontal, overlapping pattern, similar to a traditional perm.
Secure this rod so it connects to the first rod. The two rods should sit close together without gaps.
Step 5: Repeat for All Sections
Continue wrapping each subsection with two rods. Work methodically through each main section of your head. This process takes time—do not rush. Even wrapping creates even curls.
Step 6: Apply Perm Solution
Once all rods are in place, put on your gloves. Apply the perm solution evenly to each rod. Saturate the hair completely, but avoid letting the solution drip onto your scalp.
Follow the instructions on your perm kit for processing time. Most perms process for 15 to 25 minutes, depending on your hair type. Fine hair processes faster than thick, coarse hair.
Set a timer and check your curls halfway through. Gently unwind one rod to see if the curl has formed. If the curl holds its shape, the perm is ready. If not, rewind the rod and wait a few more minutes.
Step 7: Rinse Thoroughly
Rinse your hair with warm water while the rods are still in place. Rinse for at least 5 to 7 minutes to remove all traces of the perm solution. Do not skip this step—leftover solution can damage your hair.
Gently squeeze out excess water from each rod. Do not rub or twist the rods.
Step 8: Dry the Rods
Blot the rods with a towel to remove excess water. You can let them air dry for 5 to 8 minutes, or use a blow dryer on a low, cool setting to speed up the process.
The hair should feel damp but not soaking wet before you apply the neutralizer.
Step 9: Apply Neutralizer
Apply the neutralizer to each rod, saturating the hair completely. The neutralizer stops the chemical process and locks in the curl shape. It also restores your hair’s pH balance, which prevents damage.
Leave the neutralizer on for the time recommended in your kit instructions—usually 5 to 10 minutes.
Step 10: Rinse and Remove Rods
Rinse your hair again with cool water to remove the neutralizer. Keep the rods in place during this rinse.
Carefully unwind each rod, starting from the bottom sections and working your way up. Do not pull or tug on the curls. Let them fall naturally.
Step 11: Style and Dry
Gently scrunch your curls with a microfiber towel to remove excess water. Apply a curl-defining cream or mousse to help the curls hold their shape.
Let your hair air dry, or use a diffuser attachment on your blow dryer to dry the curls gently. Avoid brushing or combing your hair for at least 48 hours after the perm.
Can You Do a Piggyback Perm on Yourself?
Yes, you can do a piggyback perm at home, but it is challenging. This technique requires precise sectioning, even wrapping, and good hand coordination. Working on the back of your head is especially difficult.
If you decide to do it yourself, use a home kit for perming designed for your hair type. Read all instructions before you start. Set up a mirror system so you can see the back of your head clearly.
Tips for DIY Piggyback Perm
- Ask a friend to help, especially with the back sections
- Work in a well-lit area with good ventilation
- Start with the top and front sections first
- Use clips to keep unworked sections out of the way
- Keep your perm solution and neutralizer within easy reach
- Set multiple timers so you do not over-process your hair
- Protect your clothing and workspace with towels or plastic
If you have never done a perm before, consider visiting a professional stylist for your first piggyback perm. You can learn the technique by watching, then try it yourself later.
How to Roll a Spiral Piggyback Perm
A spiral piggyback perm combines the two-rod technique with spiral wrapping. This creates curls that resemble tight springs or corkscrew patterns.
Rod Selection
Use long, slender perm rods for both the base and end sections. The rods should be the same diameter to create uniform spirals.
Wrapping Technique
Wrap the hair around each rod in a spiral pattern rather than horizontally. The hair should twist around the rod at an angle, creating a diagonal wrap. This technique produces tighter, more defined curls.
Position the base rod near the scalp and spiral the hair down toward the middle of the strand. Then attach the second rod and continue the spiral to the ends.
Processing and Styling
Follow the same perm solution and neutralizer steps as a standard piggyback perm. Spiral curls may need slightly longer processing time because the hair is wrapped more tightly.
After removing the rods, avoid separating the curls too much. Spiral piggyback perms create defined ringlets that look best when left intact.
Cost of a Piggyback Perm
A piggyback perm usually costs between $40 and $200.
The price depends on several factors:
- Hair length: Longer hair costs more because it requires more product and time
- Salon location: Urban salons charge more than rural salons
- Stylist experience: Senior stylists charge higher rates
- Product quality: Premium perm solutions cost more but cause less damage
- Curl type: Spiral piggyback perms may cost more due to the detailed wrapping technique
For a better understanding of pricing factors, check how much perms typically cost based on hair length and type.
Price Breakdown by Hair Length
| Hair Length | Average Cost |
|---|---|
| Shoulder-length | $50 – $80 |
| Mid-back length | $80 – $120 |
| Waist-length | $120 – $180 |
| Hip-length or longer | $180 – $250+ |
Additional Costs to Consider
- Haircut or trim: $20 – $50 (often recommended before perming)
- Deep conditioning treatment: $15 – $40
- Specialty products: $30 – $60 (curl creams, sulfate-free shampoos)
Best Products for Piggyback Perms
The products you use make a big difference in the quality of your perm and the health of your hair. You need perm rods, wrapping papers, perm solution, and neutralizer at minimum.
Essential Products
Here are the key products you need for a successful piggyback perm.


Choosing the Right Perm Solution
Your hair type determines which perm solution you need:
- Acid perms: Best for fine, damaged, or color-treated hair. They are gentler and create softer curls.
- Alkaline perms: Best for coarse, resistant, or virgin hair. They create stronger, longer-lasting curls.
- Exothermic perms: Use heat to process the curls. They work well on hard-to-curl hair.
Always follow the manufacturer’s instructions for processing time. Over-processing damages your hair and can cause breakage.
Recommended Perm Rod Sizes
| Curl Type | Base Rod Size | End Rod Size |
|---|---|---|
| Loose waves | 3/4 inch – 1 inch | 1 inch – 1.25 inches |
| Medium curls | 1/2 inch – 3/4 inch | 3/4 inch – 1 inch |
| Tight curls | 1/4 inch – 1/2 inch | 1/2 inch – 3/4 inch |
How to Care for Your Piggyback Perm
Proper aftercare keeps your curls bouncy and healthy for months. Follow these steps to maintain your perm.
First 48 Hours After Your Perm
- Do not wash your hair for 48 hours. The curl pattern needs time to set.
- Avoid getting your hair wet in the shower. Use a shower cap.
- Do not tie your hair up or use hair accessories. Let your curls hang loose.
- Avoid heat styling tools like flat irons or curling irons.
- Do not brush or comb your hair. Use your fingers to gently separate curls.
Daily Perm Care Routine
- Wash your hair 2-3 times per week with a sulfate-free shampoo. Sulfates strip moisture and make curls frizzy.
- Condition every time you wash. Use a moisturizing conditioner designed for curly or chemically treated hair.
- Apply a leave-in conditioner or curl cream to damp hair. This defines curls and reduces frizz.
- Air dry or use a diffuser. Avoid rubbing your hair with a towel. Scrunch gently with a microfiber towel or t-shirt instead.
- Sleep on a silk or satin pillowcase. This reduces friction and prevents frizz overnight.
Weekly Treatments
- Deep condition once a week. Apply a deep conditioning mask or hair oil treatment to restore moisture.
- Use a protein treatment every 2-3 weeks. Perms break down the protein structure in your hair. Protein treatments rebuild strength.
What to Avoid
- Heat styling tools (flat irons, curling irons, hot rollers)
- Brushing dry hair (this causes frizz and breakage)
- Tight hairstyles like ponytails or buns
- Chlorine and salt water (wear a swim cap when swimming)
- Over-washing (this dries out curls)
How Long Does a Piggyback Perm Last?
A piggyback perm typically lasts 3 to 6 months, depending on your hair type and how well you care for it.
Factors That Affect Perm Longevity
- Hair texture: Coarse hair holds curls longer than fine hair
- Hair health: Damaged hair loses curl faster
- Perm solution strength: Alkaline perms last longer than acid perms
- Aftercare routine: Proper care extends the life of your perm
- Heat styling: Frequent heat use loosens curls over time
As your hair grows, the roots will appear straight while the ends remain curly. Most people get a touch-up perm after 4 to 5 months to maintain consistent curl from root to tip.
Potential Risks and Side Effects
Perms use strong chemicals to change your hair structure. While generally safe when done correctly, they can cause side effects.
Hair Damage
Over-processing or using the wrong perm solution can cause:
- Dryness and brittleness
- Split ends
- Breakage and hair loss
- Frizz and loss of curl definition
Scalp Irritation
Perm solutions contain thioglycolate, which can irritate sensitive skin. Symptoms include:
- Redness and itching
- Burning or stinging sensation
- Flaking or peeling scalp
- Chemical burns (in severe cases)
If you experience any of these symptoms during the perm process, rinse the solution out immediately and seek medical advice.
Who Should Avoid Piggyback Perms?
- People with severely damaged or over-processed hair
- People with sensitive skin or scalp conditions like eczema or psoriasis
- Pregnant or breastfeeding women (consult your doctor first)
- People who recently bleached or dyed their hair (wait at least 2 weeks)
Understanding how perms work and their ingredients can help you make an informed decision about this treatment.
Frequently Asked Questions About Piggyback Perms
Can I color my hair after a piggyback perm?
Wait at least 2 weeks after your perm before coloring your hair. Perming and coloring both use strong chemicals that can damage your hair if done too close together. Always deep condition your hair before coloring to protect it.
Can I straighten my piggyback perm if I don’t like it?
Yes, but wait at least 2 weeks and deep condition your hair regularly. You can use a flat iron to temporarily straighten your curls, or visit a salon for a chemical straightening treatment. However, this adds more chemical processing to already treated hair, which increases the risk of damage.
Will a piggyback perm damage my hair?
All perms cause some level of damage because they use chemicals to break and reform hair bonds. However, the damage is minimal if you use the right products, follow proper technique, and care for your hair afterward. Choose an acid perm if your hair is already damaged or color-treated.
How often can I get a piggyback perm?
Wait at least 4 to 6 months between perms. Getting perms too frequently damages your hair and causes breakage. Let your hair rest and recover between treatments.
Can I swim with a piggyback perm?
Yes, but protect your hair. Chlorine and salt water dry out curls and cause frizz. Wet your hair with clean water before swimming, then apply a leave-in conditioner. Wear a swim cap if possible. Rinse your hair immediately after swimming and apply a deep conditioner.
Why are my piggyback perm curls falling flat?
Your curls may be falling flat because:
- You used too large of a rod size
- The perm solution was not strong enough for your hair type
- The solution was not left on long enough
- You washed your hair too soon after the perm
- Your hair is very fine or slippery and does not hold curls well
Use styling products like mousse or curl cream to add volume and definition to weak curls.
Can I do a piggyback perm on layered hair?
Yes, but the curls may look different on different layers. Shorter layers will have tighter curls because there is less hair to wrap around the rods. Longer layers will have looser curls. This creates a natural, blended look.
What is the difference between a piggyback perm and a stack perm?
A piggyback perm uses two rods per section placed horizontally to create even curls on very long hair. A stack perm uses multiple rods stacked on top of each other vertically to create volume at the crown and curls at the ends. Both techniques add volume, but stack perms focus on lift at the roots.
Alternatives to Piggyback Perms
If a piggyback perm is not right for you, consider these alternatives.
Body Wave Perm
A body wave perm creates loose, natural-looking waves instead of defined curls. It uses larger rods and a gentler perm solution. This option works well for people who want volume and movement without tight curls.
Digital Perm
A digital perm uses heat and chemicals to create soft, long-lasting curls. The curls look more relaxed when hair is wet and tighten as hair dries. Digital perms are gentler on hair than traditional perms and last 6 to 12 months.
Root Perm
A root perm only treats the hair at the scalp, adding volume and lift without curling the entire length. This is ideal for people with flat hair who want body at the roots.
Heatless Curl Methods
If you want to avoid chemicals entirely, try heatless curling methods like:
- Braiding damp hair overnight
- Using foam rollers or flexi rods
- Wrapping hair around a bathrobe tie or sock
- Pin curls
These methods are temporary but do not damage your hair.
Final Thoughts
A piggyback perm is a specialized technique for people with very long hair who want even, natural-looking curls from root to tip. It uses two rods per section to distribute hair evenly and create consistent curl patterns.
This perm takes more time and effort than standard perms, but the results are worth it. You get beautiful, bouncy curls that last for months with proper care.
Whether you choose to visit a salon or try a piggyback perm at home, follow the steps carefully and use quality products. Always deep condition your hair regularly and avoid excessive heat styling to keep your curls healthy and vibrant.
Remember that perms use strong chemicals containing thioglycolate solution. While generally safe, too frequent perming can lead to scalp irritation, dryness, breakage, and reduced hair growth. Understand how perms work and their ingredients before committing to this treatment, and always perform a patch test if you have sensitive skin.
| Photo | Popular Hair Product | Price |
|---|---|---|
|
|
Kkioor 24 Inch Chocolate Brown Human Hair Wig 200 Density Body Wave Lace Front Wigs Human Hair Pre Plucked 13X4 HD Frontal Wig 4# Colored Brown Wig For Women Glueless Wigs | Check Price On Amazon |
|
|
KingSup 613 Lace Front Wig Human Hair Pre Plucked 250 Density 26 Inch 5x5 HD Lace Closure Straight Blonde Wig Human Hair, 100% Real Human Hair without Synthetic Blend Tangle Free Triple Lifespan 3X | Check Price On Amazon |
|
|
WIGCHIC 16" Kinky Curly Half Wig Human Hair Burgundy & Dark Roots | Flip-Over Drawstring | Seamless 4C Hairline | True Length | 3-in-1 Styling | Beginner Friendly (T1B/99J) | Check Price On Amazon |
|
|
Hair Removal Cream for Men & Women: Painless Depilatory for Sensitive Skin & Intimate Areas, Moisturizing with Aloe Vera & Vitamin E, Safe for Face, Underarms, Bikini, Arms (3.7 Fl Oz (Pack of 2)) | Check Price On Amazon |
|
|
ZOOLY PROFESSIONAL Ginger Shampoo and Conditioner Sets 20.3 Fl Oz- Anti Hair Loss and Nourishes Hair Roots, Salon Level Scalp Care for Men and Women | Check Price On Amazon |
|
|
LUSN Baby Hair Clippers with Vacuum, Quiet Hair Trimmers for Kids, IPX7 Waterproof Rechargeable Cordless Haircut Kit for Baby Children Infant | Check Price On Amazon |
|
|
LURA Dual Voltage Travel Hair Dryer with Diffuser,Travel Blow Dryer Mini with EU Plug and UK Plug,Lightweight Portable Hairdryers with Folding Handle,1200W Compact Small Blowdryers for Women | Check Price On Amazon |