How To Install a Wig? How Long Does It Take to Install a Wig?

Have you found a beautiful wig online or in a wig shop that you want to buy, or perhaps you have already purchased a wig and need to get it installed?
It is important to know the step-by-step process to install a wig and also how long it takes to get a wig installation done.
| Photo | Popular Hair Product | Price |
|---|---|---|

|
Kkioor 24 Inch Chocolate Brown Human Hair Wig 200 Density Body Wave Lace Front Wigs Human Hair Pre Plucked 13X4 HD Frontal Wig 4# Colored Brown Wig For Women Glueless Wigs | Check Price On Amazon |

|
KingSup 613 Lace Front Wig Human Hair Pre Plucked 250 Density 26 Inch 5x5 HD Lace Closure Straight Blonde Wig Human Hair, 100% Real Human Hair without Synthetic Blend Tangle Free Triple Lifespan 3X | Check Price On Amazon |

|
WIGCHIC 16" Kinky Curly Half Wig Human Hair Burgundy & Dark Roots | Flip-Over Drawstring | Seamless 4C Hairline | True Length | 3-in-1 Styling | Beginner Friendly (T1B/99J) | Check Price On Amazon |

|
Hair Removal Cream for Men & Women: Painless Depilatory for Sensitive Skin & Intimate Areas, Moisturizing with Aloe Vera & Vitamin E, Safe for Face, Underarms, Bikini, Arms (3.7 Fl Oz (Pack of 2)) | Check Price On Amazon |

|
ZOOLY PROFESSIONAL Ginger Shampoo and Conditioner Sets 20.3 Fl Oz- Anti Hair Loss and Nourishes Hair Roots, Salon Level Scalp Care for Men and Women | Check Price On Amazon |

|
LUSN Baby Hair Clippers with Vacuum, Quiet Hair Trimmers for Kids, IPX7 Waterproof Rechargeable Cordless Haircut Kit for Baby Children Infant | Check Price On Amazon |

|
LURA Dual Voltage Travel Hair Dryer with Diffuser,Travel Blow Dryer Mini with EU Plug and UK Plug,Lightweight Portable Hairdryers with Folding Handle,1200W Compact Small Blowdryers for Women | Check Price On Amazon |
Let us understand in detail the steps involved in the wig installation process.
How To Install a Wig?
When looking to install a wig, you need several products and you also need to follow several steps to ensure that you get it right. So, if you have purchased that wig you love and want to install the wig, here is what it entails.
1. Prep your hair
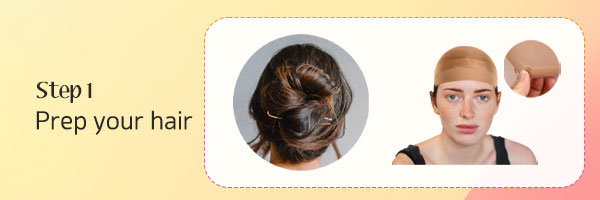
Preparing your hair is essential, and it entails first ensuring that your hair is braided and safely covered. The best thing is to weave your hair in cornrows, with the numbers depending on how full your hair is.
Ensure that your hair is clean and moisturized before braiding it. Then, proceed to put on a wig cap or stocking cap to protect your hair from the wig and any adhesive that would be used in the installation process.
It is always best to get a cap that matches your complexion or is close. A nude wig cap is always better, or a lighter colored one, so that you can use a makeup foundation to create a tint on the visible part of the cap so that it matches your skin tone.
After putting on the cap, you can make it lay flat by using a freeze spray. Use the spray along the perimeter of the cap that sits on your hairline. When the spray dries, proceed to cut the wig cap along the hairline to create a smooth and somewhat bald hairline.
After this, ensure to clean the area where you’re going to place the wig and adhere it to your skin. You can use an alcohol pad to wipe the front of the hairline to remove dirt or residue from any skincare product or makeup you might have used.
2. Preparing the wig
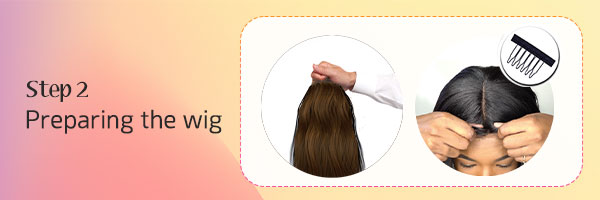
After preparing your hair, the next thing to do is to get your wig set, and this could entail bleaching the knots and plucking the wig strands. However, it is not always necessary because some wigs won’t need bleaching, and some others come pre-plucked.
If you need to bleach your wig knots to make them look natural, you can mix bleaching powder and 20-volume developer to form a thick paste. Then, turn your wig inside out and apply the mixture with a brush.
Leave the paste on your wig for about 20 minutes, use water to rinse it off, and then use shampoo to wash it off. If you’ve bleached blonde hair, then you need a purple shampoo to wash it off.
The purple shampoo doesn’t change your wig color, but simply ensures that your wig knots don’t turn orange or into an unattractive color.
Another step is to pluck your wig, which is necessary to get the hairline looking as natural as possible. You’ll need tweezers for this step.
This step can be a little tedious, especially for a first-timer, but you can get someone to guide you.
What you need to do with the tweezers is to remove some strands of wig hair so that you can break demarcation lines in front of the wig that makes it look unnatural.
Remember that your natural hair doesn’t have harsh lines in front, so a natural-looking wig shouldn’t look that way.
Secure your wig to a wig head using t-pins and then work along your wig hairline plucking the strands in twos or one by one. Avoid spending too much time on one section because you might be prone to overplucking.
It is always best to alternate across the two sides of the wig while plucking from different sections until you are sure you have plucked enough.
3. Wig Application
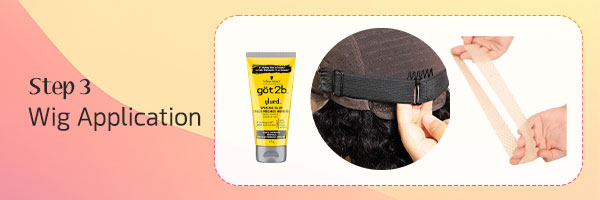
Now that your wig cap is set and the wig has been prepared, the next installation step is to apply adhesive and glue down the wig.
There are lots of wig adhesives available to you, but the best ones to use are those that deliver firm hold, dry in a few minutes, and don’t irritate the skin.
A great wig adhesive to use is Got2B glue. It can hold firm despite sweat and will be set in a few minutes, so it is ready to stick firmly when you place your wig.
Apply the glue a thin line along your hairline and use a makeup sponge to smoothen it. Dry the glue with a blow dryer until it is clear but not dried out.
You should apply a second layer and dry it until it is clear again. You can add a third coat as well. Applying multiple layers of glue allows the lace to blend into the skin seamlessly.
You can also use wig tape for this process. Cut as many strips of wig tape you need to cover your entire hairline while paying attention to the part and style of your wig.
Peel one side of your wig tape and attach it to your hairline (not your hair). Ensure that it sticks firmly. You can remove the peel on the other side and put your wig on it when you’re ready.
Place the front, lace part of your wig directly on top of your hairline while adjusting the position until it looks natural and lays on your hairline properly.
Hold the wig down with an elastic band or scarf for 10 or 20 minutes so that the glue or tape sticks tightly to the wig before moving to the next stage.
The next step is cutting off the excess lace. Begin by making two vertical cuts into the excess lace directly above the highest points of both your eyebrows. Then, proceed to cut off the lace from the wig slowly and carefully while following the design of a natural hairline.
Use small hair or nail scissors for this stage. If you are new to this, you should watch a video by a wig expert while doing this so that you can mirror what you see in the video.
You’re not done with the lace until you ‘melt’ it in the final process. While the adhesive you have applied does a great job of melting the lace on the inside, you need a freeze spray to melt it outside and make it undetectable.
Apply the spray across the hairline and use the back of a comb to press it in. After pressing it in, you can use a satin scarf to tie the wig hairline down. You can also use heat from a hooded dryer or blow dryer to blend the lace better.
4. Wig Styling
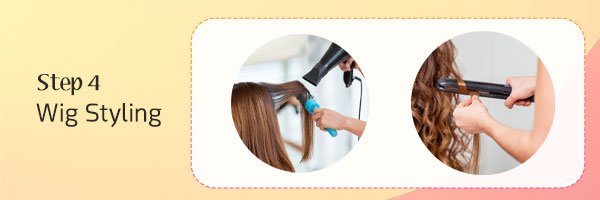
Once your application is done, you can’t say it is the end until you style the rest of your wig.
Depending on the nature of your wig, you can explore several styling methods, including brushing, straightening, or curling.
Always find out what amount of heat your wig can withstand when engaging in your styling. You can also look for styles to explore with your wig.
If your wig doesn’t come with pre-cut baby hairs, you can cut your baby hair yourself from the front of your hairline. The baby hair can be anywhere from a quarter of an inch to one inch long, depending on how much hair you have on your hairline.
Use a tail comb to take some hair off the front of the wig and separate it. Comb this part you have separated and then use a razor to shorten the strands depending on the length of strands you want.
Mold it into the form and style you want using an edge control or mousse and tie it down, and then dry with a blow dryer.
If you need to smooth your part, you can do that by using a hot comb to press out the hairline for a more natural appearance.
How Long Does a Wig Install Take?
The time needed to install a wig often varies, depending on the type of wig you are installing, and the speed and expertise of the person installing the wig.
However, lace frontal wigs don’t take so long to install. You can install lace frontal wigs in an average of an hour, or an hour and thirty minutes for extensions with frontals.
This time is short compared to the installation of sew-in natural hair extensions that take between 2 and 4 hours.
Final Words:
Now, you know all that you need to about the process of installing a wig. So, the next time you purchase a wig, you know everything you should about the products needed that will help you to estimate the wig installation cost also.
You can either carry out the installation by yourself or visit a hairstylist if you think the installation process is too complex to be carried out alone. If you’re interested in specific types of wigs, consider exploring bob wigs for a chic, shorter style or closure wigs which are another popular option that many find easier to install.
After installation, you’ll want to know how long you can wear your wig before it needs to be removed and cleaned to maintain both the wig’s condition and your natural hair health.
| Photo | Popular Hair Product | Price |
|---|---|---|
|
|
Kkioor 24 Inch Chocolate Brown Human Hair Wig 200 Density Body Wave Lace Front Wigs Human Hair Pre Plucked 13X4 HD Frontal Wig 4# Colored Brown Wig For Women Glueless Wigs | Check Price On Amazon |
|
|
KingSup 613 Lace Front Wig Human Hair Pre Plucked 250 Density 26 Inch 5x5 HD Lace Closure Straight Blonde Wig Human Hair, 100% Real Human Hair without Synthetic Blend Tangle Free Triple Lifespan 3X | Check Price On Amazon |
|
|
WIGCHIC 16" Kinky Curly Half Wig Human Hair Burgundy & Dark Roots | Flip-Over Drawstring | Seamless 4C Hairline | True Length | 3-in-1 Styling | Beginner Friendly (T1B/99J) | Check Price On Amazon |
|
|
Hair Removal Cream for Men & Women: Painless Depilatory for Sensitive Skin & Intimate Areas, Moisturizing with Aloe Vera & Vitamin E, Safe for Face, Underarms, Bikini, Arms (3.7 Fl Oz (Pack of 2)) | Check Price On Amazon |
|
|
ZOOLY PROFESSIONAL Ginger Shampoo and Conditioner Sets 20.3 Fl Oz- Anti Hair Loss and Nourishes Hair Roots, Salon Level Scalp Care for Men and Women | Check Price On Amazon |
|
|
LUSN Baby Hair Clippers with Vacuum, Quiet Hair Trimmers for Kids, IPX7 Waterproof Rechargeable Cordless Haircut Kit for Baby Children Infant | Check Price On Amazon |
|
|
LURA Dual Voltage Travel Hair Dryer with Diffuser,Travel Blow Dryer Mini with EU Plug and UK Plug,Lightweight Portable Hairdryers with Folding Handle,1200W Compact Small Blowdryers for Women | Check Price On Amazon |
