Popular Beehive Hairstyles | How to Do Beehive Hairstyle | Sprays & Wigs

Every week, fashion magazines showcase amazing new trends. But nothing beats the return of iconic styles from the past. The 1960s brought bold, daring hairstyles that continue to inspire modern fashionistas who aren’t afraid to bring retro glamour back to life.
The beehive hairstyle, also called the B-52, was one of the most popular styles of the 1960s. It gets its name from its resemblance to an actual beehive and the nose cone of the B-52 bomber aircraft. This vintage look requires patience, hairspray, and plenty of bobby pins to create.
| Photo | Popular Hair Product | Price |
|---|---|---|

|
Kkioor 24 Inch Chocolate Brown Human Hair Wig 200 Density Body Wave Lace Front Wigs Human Hair Pre Plucked 13X4 HD Frontal Wig 4# Colored Brown Wig For Women Glueless Wigs | Check Price On Amazon |

|
KingSup 613 Lace Front Wig Human Hair Pre Plucked 250 Density 26 Inch 5x5 HD Lace Closure Straight Blonde Wig Human Hair, 100% Real Human Hair without Synthetic Blend Tangle Free Triple Lifespan 3X | Check Price On Amazon |

|
WIGCHIC 16" Kinky Curly Half Wig Human Hair Burgundy & Dark Roots | Flip-Over Drawstring | Seamless 4C Hairline | True Length | 3-in-1 Styling | Beginner Friendly (T1B/99J) | Check Price On Amazon |

|
Hair Removal Cream for Men & Women: Painless Depilatory for Sensitive Skin & Intimate Areas, Moisturizing with Aloe Vera & Vitamin E, Safe for Face, Underarms, Bikini, Arms (3.7 Fl Oz (Pack of 2)) | Check Price On Amazon |

|
ZOOLY PROFESSIONAL Ginger Shampoo and Conditioner Sets 20.3 Fl Oz- Anti Hair Loss and Nourishes Hair Roots, Salon Level Scalp Care for Men and Women | Check Price On Amazon |

|
LUSN Baby Hair Clippers with Vacuum, Quiet Hair Trimmers for Kids, IPX7 Waterproof Rechargeable Cordless Haircut Kit for Baby Children Infant | Check Price On Amazon |

|
LURA Dual Voltage Travel Hair Dryer with Diffuser,Travel Blow Dryer Mini with EU Plug and UK Plug,Lightweight Portable Hairdryers with Folding Handle,1200W Compact Small Blowdryers for Women | Check Price On Amazon |
The beehive works beautifully for proms, weddings, and parties. With some changes, you can wear it daily, make it office-appropriate, or create a messier version for a chic, casual look. With so many options available, you can experiment freely and expect plenty of compliments.
History of Beehive Hairstyle
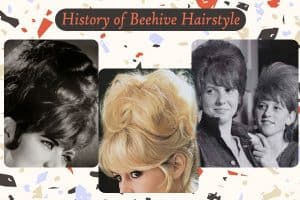
The history of beehive hairstyle is as interesting as the style itself. Margaret Vinci Heldt, a hairstylist from Illinois who owned Margaret Vinci Coiffures in downtown Chicago, created this iconic look.
In 1960, editors from Modern Beauty Salon magazine asked her to design a hairstyle that would represent the new decade. She drew inspiration from her favorite fez hat, which never messed up her hair. She wanted to create a style that would last for days without needing a complete redo.
This longevity became one of the style’s biggest selling points. Women only needed to smooth stray hairs, and their beehive would look fresh again. A magazine reporter suggested the name “beehive” after noticing how much the style looked like an actual beehive. The name stuck forever.
Many celebrities adopted this look throughout the decades, which increased its popularity. The style evolved over time, but the classic beehive still holds a special place among retro-style lovers. Even Marge Simpson from the animated series The Simpsons is famous for her towering blue beehive.
What You Need to Know Before Creating a Beehive
Who Can Wear a Beehive Hairstyle?
Almost anyone can wear a beehive, regardless of hair length. Women with long, medium, or short hair can all create versions of this style. Hair thickness matters more than length. Thicker hair creates more natural volume, while thinner hair may need extra teasing or added volume pieces.
Best Hair Types for Beehive Styles
- Fine hair: Needs extra backcombing and strong-hold hairspray
- Medium hair: Works perfectly with standard techniques
- Thick hair: Creates natural volume but may be harder to pin securely
- Curly hair: Should be straightened first for a smooth finish
- Straight hair: Holds shape well and creates clean lines
When to Wear a Beehive
The beehive works for many occasions. Formal events like weddings, proms, and galas are perfect settings. Themed parties, especially retro or vintage events, suit this style naturally. You can also create modified versions for work or casual outings.
When NOT to Wear a Beehive
- During physical activities or workouts (the style will collapse)
- In very humid weather without proper products
- If you have severe scalp sensitivity or traction alopecia
- When you need to wear tight headwear like helmets
How to Do a Beehive Hairstyle
The beehive looks fancy but is fairly simple to create with patience. This style doesn’t require many products compared to other updos. Follow these steps to get a beautiful beehive hairstyle:
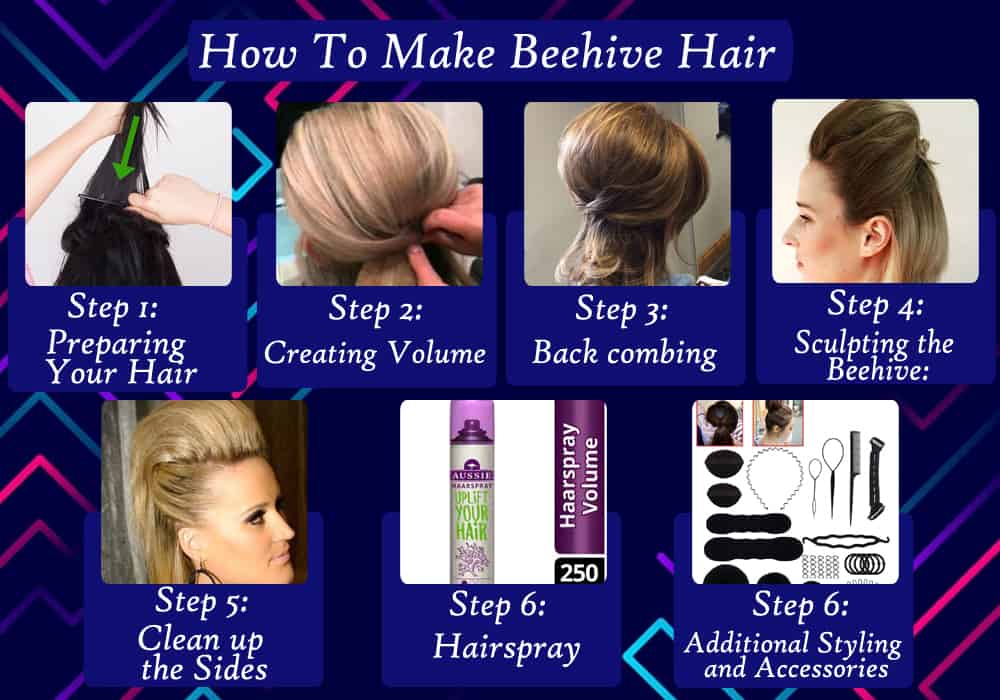
Step 1: Preparing Your Hair
Wash your hair one day before styling. Make sure your hair is completely dry before you start. The beehive works better on hair that isn’t freshly washed. Slightly greasy hair helps create more volume and grip. You can apply hair serum evenly throughout all sections for added texture and hold.
Step 2: Creating Volume
Bend forward at the waist and let your hair fall over your head. Gently fluff it with your fingers to add natural volume. Stand back up and decide how tall you want your beehive. This initial fluffing creates the foundation for your style.
Step 3: Backcombing (Teasing)
Backcombing is a technique where you comb hair toward your scalp, opposite to its natural growth direction. This method, also called teasing, creates the base for elevated hairstyles by bunching the hair strands together.
Take a small section of hair about 1.5 inches wide from the crown area. Hold it straight up. Using a fine-toothed comb or bristle brush, comb downward toward your scalp in short, firm strokes. Start about 2-3 inches from the roots and work your way down.
Tease each section until it reaches your desired height. Apply light hairspray to each teased section to set it. Repeat this process with additional sections until you’ve covered the entire crown area. Leave some front sections un-teased if you want bangs or face-framing pieces.
Step 4: Sculpting the Beehive
Gently smooth the surface of the teased hair with your comb, using only the top layer. Keep the front of the beehive at your desired height. Pull the sides close to your head to create the classic beehive shape. The style should be wider at the top and narrower at the base.
Secure the structure with bobby pins. Insert pins diagonally for maximum hold. Push each pin upward and into the hair to maintain volume and height. Use as many pins as needed. Most beehives need 10-15 bobby pins minimum.
Step 5: Clean Up the Sides
Smooth the side sections and pin them tightly against your head. This contrast between the voluminous top and sleek sides creates the signature beehive silhouette. Use a fine-toothed comb to catch any loose or flyaway hairs. Tuck them into the style with bobby pins.
Step 6: Apply Hairspray
This step is critical for longevity. Hold the hairspray bottle 8-10 inches away from your head. Spray generously over the entire beehive, covering all angles. Focus extra spray on the teased sections and the crown. A well-sprayed beehive can last several days with careful maintenance.
Let the hairspray dry for 2-3 minutes before touching your hair. Apply a second coat if needed. The hair should feel firm but not crunchy or stiff.
Step 7: Additional Styling and Accessories
After creating your base beehive, you can style it many ways. Add flowers, ribbons, decorative pins, or headbands. You can also style the remaining hair into curls, braids, or a bun. Accessories add a feminine touch and can make the retro style more modern.
Troubleshooting Common Beehive Problems
Beehive Falls Flat
Cause: Not enough backcombing or insufficient hairspray.
Solution: Add more teasing at the roots and use stronger hold hairspray. Consider adding a small hair pad or bump-it insert for extra support.
Too Many Flyaways
Cause: Hair is too clean or dry, creating static.
Solution: Apply smoothing serum to the surface. Use a soft-bristle brush lightly sprayed with hairspray to smooth the outer layer.
Bobby Pins Keep Sliding Out
Cause: Pins inserted incorrectly or hair too slippery.
Solution: Insert pins at an angle, pushing up into the teased hair. Cross two pins in an X shape for extra security. Spray pins with hairspray before inserting them.
Hair Feels Too Stiff or Crunchy
Cause: Too much hairspray applied too closely.
Solution: Hold spray farther away and apply in lighter coats. Use a flexible-hold spray instead of maximum hold.
How to Maintain Your Beehive
Daily Maintenance
A well-constructed beehive can last 2-3 days with proper care. Before bed, wrap your hair loosely in a silk scarf to protect the shape. Sleep on a satin pillowcase to reduce friction. In the morning, gently smooth any bumps with your hands. Add more hairspray to areas that look loose. Use bobby pins to secure any sections that shifted overnight.
Taking Down the Beehive
Never brush or comb teased hair while dry. This can cause serious breakage and tangles. First, remove all bobby pins carefully. Apply a generous amount of conditioner or detangling spray to dry hair. Let it sit for 5-10 minutes. Working in small sections, gently separate the hair with your fingers. Then use a wide-tooth comb to slowly work through tangles, starting from the ends and moving up to the roots.
Hair Recovery After Backcombing
Backcombing can stress your hair. After wearing a beehive, wash your hair with a moisturizing shampoo. Use a deep conditioning treatment to restore moisture. Avoid heat styling for a day or two. Let your hair rest before creating another teased style. Don’t create beehives more than twice per week to prevent damage.
Popular Beehive Hairstyles
The beehive is a voluminous style that adds height and drama. Women with long, medium, or short hair can all wear variations of this classic look. You can add color, accessories, or modern touches to make the style your own. Here are trending ideas for beautiful beehive hairstyles.
Modern Beehive Hairstyles
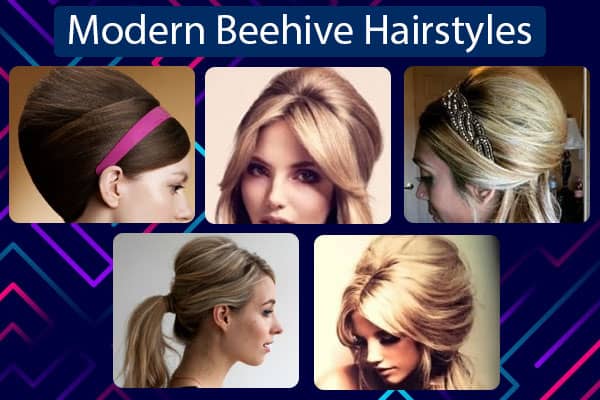
Modern beehives blend retro structure with current trends. These versions tend to be slightly lower and less structured than classic styles. They often incorporate texture, loose pieces, and contemporary accessories.
Crimped Beehive
This style combines two retro trends into one eye-catching look. Start by crimping your entire head of hair with a crimping iron. Then create your beehive as usual. The crimped texture adds extra volume and creates an interesting visual texture. This style looks fresh and definitely stands out in a crowd.
Half and Half Beehive
This versatile option works for both formal and casual settings. Create a medium-sized beehive from the crown of your head and pin it at the center. Leave the rest of your hair flowing freely with soft curls or waves. Side-swept bangs or blunt front bangs enhance this look. This style gives you the drama of a beehive without being too bold.
Low Ponytail Beehive
This professional option works perfectly for office environments and casual outings. Create a beehive from the center top of your head. Smooth the sides back into a low ponytail at the nape of your neck. The combination gives you a chic, polished look that’s appropriate for any setting. Side-sweep your front hair for a softer finish.
Braided Partial Beehive
This edgy style brings out your inner rock star. Create a beehive only at the upper part of your head. Add tight braids along the sides, starting at your temples and running down past your ears. Keep the lower half of your hair sleek and straight. The contrast between the voluminous top, textured braids, and smooth bottom creates a striking effect.
Messy Beehive with Side Swept Bangs
This is the easiest way to make a beehive look modern. Create your beehive but don’t smooth the surface perfectly. Leave some texture and loose pieces visible. Create clean, side-swept bangs for contrast. You can add an embellished headband for special occasions. This style looks effortlessly fashionable and feminine.
Retro Beehive Styles
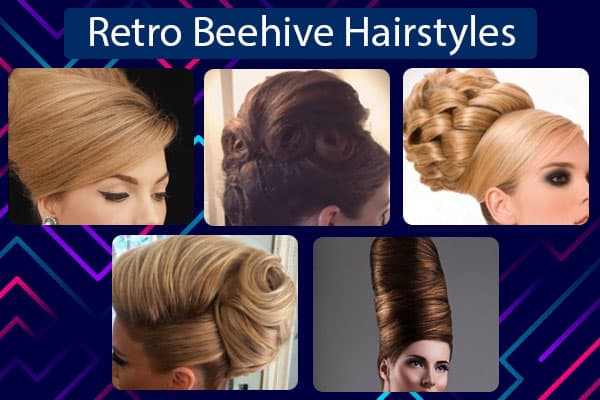
Classic beehives stay true to their 1960s origins. These styles feature maximum height, smooth surfaces, and vintage accessories. They’re perfect for costume parties, themed events, or anyone who loves authentic retro fashion.
Smooth Beehive with Side Bow
Side bows were a signature accessory of the 1960s. Create a smooth, medium-height beehive. Place a decorative bow at the back and slightly to one side of your beehive. The bow should sit where the beehive begins to slope down. Add side-swept bangs to give your face a sculpted, polished appearance.
Pin Curl Beehive
This style combines two classic techniques: the beehive and pin curls. Create your beehive at the crown. At the ends of your hair, form tight pin curls and secure them with bobby pins. These curls sit at the base of the beehive, creating a layered effect. Short, tightly curled bangs complete the authentic vintage look.
Swirl Beehive
Similar to the pin curl version, this style features an open swirl instead of tight curls. Create your beehive, then take the end sections and curl them into visible swirls. Pin these swirls loosely to show the spiral shape. Add a flowery clip near the swirl for a romantic finishing touch.
Braided Bun Beehive
This elaborate style combines three elements: braids, a beehive, and a bun. Create a beehive at the crown and secure it with bobby pins. Form a low bun at the nape of your neck. Create two side braids starting at your temples. Wrap these braids around the bun to frame it. Soft, side-swept bangs complete the romantic look.
Tall French Twist Beehive
This is one of the most dramatic beehive variations. It’s bold and authentically 1960s. Create a very tall beehive at the crown. Instead of leaving the back hair loose, roll it into a French twist. The twist provides structural support that helps the beehive stay tall all day. This style requires confidence to pull off in modern times, but it’s stunning for vintage-themed events.
Beehive Hairstyles for Short Hair
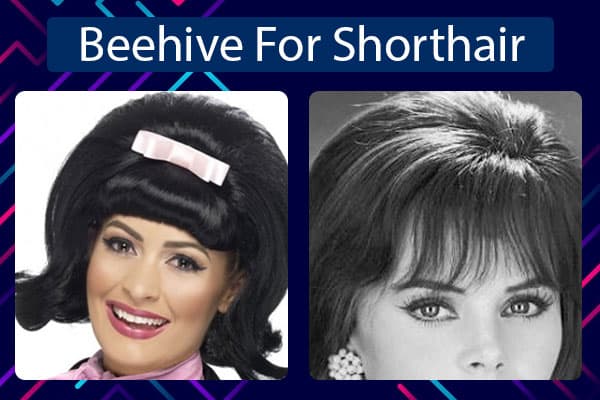
Short hair doesn’t mean you can’t rock a beehive. In fact, shorter hair often makes the style easier and faster to create. Your beehive will be smaller but can still look dramatic and stylish. Check out these beehive options for short hair:
Bob and Beehive
If you have a bob that ends at mid-neck length, you can still create a beehive. Tease and build volume at the crown of your head. Use plenty of hairspray to make sure the style holds all day. Straighten the lower half of your bob for a sleek contrast. Add a small bow clip where the beehive meets the straight hair for a cute, retro touch.
Flipped Ends Beehive
This is a fancier version of the bob and beehive. Create your beehive at the crown. Instead of straightening the ends, use a round brush and blow dryer to flip them outward slightly. Add wispy, side-swept bangs at the front. Place a decorative hair accessory at the base of the beehive. This style has a playful, feminine quality perfect for parties.
Pixie Beehive
Even very short pixie cuts can have beehive-inspired volume. Focus on creating maximum height at the crown using backcombing and strong-hold products. Keep the sides and back short and sleek. This creates a modern, edgy version of the beehive that works for everyday wear.
Beehive Hairstyles for Long Hair
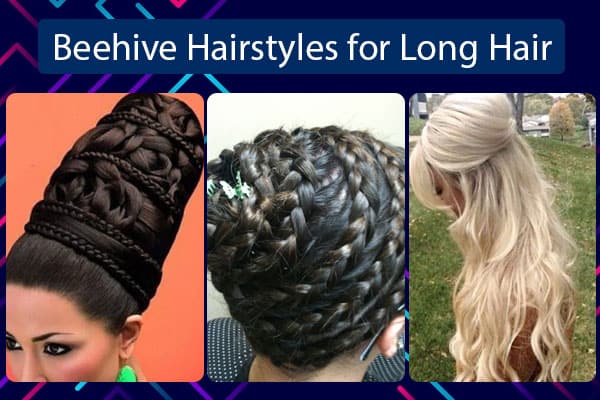
Long hair gives you the most options for beehive styling. You have enough length to create dramatic height and interesting variations with your remaining hair. Long, thick hair naturally creates impressive volume. Here are stunning ways to style beehives on long hair:
Classic Tall Beehive
If you have long hair and want an authentic retro look, go for maximum height. Tease your hair as tall as possible, building layer upon layer. Pin the structure securely with many bobby pins. This dramatic style makes a powerful statement at formal events and vintage parties.
Beehive with Long Braid
Create a beehive at the crown of your head using the top sections of hair. Take the remaining length and form it into a fishtail braid, regular three-strand braid, or any decorative braid style. Weave flowers, ribbons, or decorative pins through the braid for a romantic, feminine finish. This combination works beautifully for weddings and outdoor events.
Half Beehive with Wavy Hair
Create a beehive using only the top portion of your hair. Let the remaining length cascade down your back freely. Use a curling iron to add soft, loose waves throughout the bottom section. This creates a dreamy, romantic effect. The combination of structured volume on top and flowing waves below is perfect for special occasions.
Beehive with Victory Rolls
For an extra vintage look, combine your beehive with victory rolls. Create the beehive at the crown. Take front sections of hair and roll them into classic victory rolls on each side of your forehead. This style is very retro and works wonderfully for costume parties or vintage photo shoots.
Braided Beehive Hairstyle
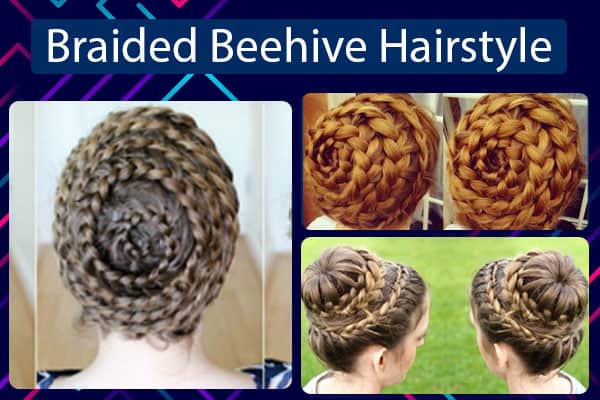
Braids and beehives create a stunning combination. The cornrow beehive bun is particularly popular. This style works especially well for textured and curly hair types.
Start by dividing your hair into 4-5 equal sections across your entire head. If you want extra length or thickness, add hair extensions and weave them into your natural hair as you braid.
Create multiple small cornrow braids in each section. The direction matters: braid upward from the nape of your neck, and braid downward from the crown. All braids should point toward the center top of your head.
Once you finish all the braids, gather them together at the center top of your head. Secure everything into a tight, high ponytail using a strong hair tie. Wrap the ponytail around itself to form a layered bun that resembles a beehive shape.
Secure the bun with many bobby pins, pushing them diagonally through the bun for maximum hold. Apply hairspray to smooth any loose hairs and add shine.
Beehive Products and Tools
Having the right products makes creating a beehive much easier. You don’t need many items, but quality matters. Here’s what you need and why each item is important:
Essential Products
- Fine-toothed comb or bristle brush: For backcombing and smoothing
- Strong-hold hairspray: To set and maintain the style
- Bobby pins (at least 20): To secure the structure
Optional Products
- Teasing brush: A specialized brush with firm bristles designed for backcombing
- Hair ties: For ponytails and braided variations
- Volume powder or texturizing spray: Adds extra grip and volume
- Hair accessories: Bows, clips, headbands, flowers, and embellishments
- Hair pads or bump-its: For extra height support
- Smoothing serum: To control flyaways on the surface
Choosing the Right Hairspray
Hairspray is the most important product for a beehive. It creates and locks in volume. Beehive Hair Studio recommends Quick Tease 15 from Redken for professional results.
For maximum hold that lasts multiple days, Aqua Net Extra Super Hold Hairspray is a classic choice that’s been used since the original beehive era. Click here to know the price and reviews.
Hairspray Hold Levels Explained
- Light/Flexible hold: Good for messy, casual beehives
- Medium hold: Works for daytime, shorter events
- Strong/Maximum hold: Best for classic beehives and all-day wear
- Freeze/Ultra hold: For extreme height and multi-day styles
Beehive Hair Wigs
If you have very short or thin hair, or if you want to try bold colors without dyeing your natural hair, beehive wigs are a great option. These pre-styled wigs come in various heights, colors, and styles.
Wigs work perfectly for costume parties, Halloween, themed events, or theatrical performances. They’re also great if you want to try the style before committing to creating it yourself.
Here are links to popular beehive wigs in different styles:
Beehive Clip-In Hair Pieces
If you don’t want a full wig but need more volume than your natural hair provides, beehive clip-in pieces are perfect. These inserts clip into your hair and instantly create the height and volume of a beehive.
Using a beehive clip saves you from extensive backcombing and potential hair damage. Simply clip the piece beneath your crown area and smooth your own hair over it. These clips come in various colors to match different hair shades.
Beehive Variations by Hair Texture
Beehive for Straight Hair
Straight hair creates the smoothest, most polished beehives. The hair lies flat and creates clean lines. Straight hair holds backcombing well and shows the classic shape clearly. Use a medium-hold hairspray to avoid a stiff appearance.
Beehive for Wavy Hair
Wavy hair adds natural texture to a beehive. You can embrace the waves for a softer, more romantic look. Or straighten your hair first for a classic finish. Wavy hair often has good natural volume, making the initial teasing easier.
Beehive for Curly Hair
Curly hair should typically be straightened or blown out before creating a traditional beehive. This gives you more control and creates the smooth surface associated with classic beehives. However, you can also create a textured beehive by working with your natural curls. This creates a more voluminous, dramatic look that’s less structured.
Beehive for Textured or Coily Hair
Textured and coily hair types work beautifully with braided beehive styles like the cornrow beehive bun. These hair types can also create stunning natural beehives by using pick-combing techniques instead of traditional backcombing. The natural volume and texture create impressive height without as much manipulation.
Beehive Hairstyle Comparisons
Beehive vs. Bouffant
These two styles are often confused because both add volume to the crown. The bouffant creates rounded volume all around the head. The beehive is more structured, with a distinct tall shape and tight sides. Bouffants are generally easier to create and more wearable for everyday situations.
Beehive vs. Updo
“Updo” is a general term for any hairstyle where hair is pinned up off the neck. A beehive is a specific type of updo. Not all updos have the height and structure of a beehive. Other updos like chignons, buns, and twisted styles can be sleek and low, while beehives are always elevated.
Beehive vs. Top Knot
A top knot is a modern bun placed at the crown or top of the head. It’s usually created without backcombing and sits in a rounded bun shape. A beehive has more structure, uses backcombing for volume, and has a conical or hive-like shape. Top knots are casual and quick; beehives are formal and time-intensive.
Beehive Styling for Different Face Shapes
Oval Face
Oval faces can wear any beehive height. This balanced face shape works with both dramatic tall beehives and more moderate versions. Add bangs or keep hair off the face based on personal preference.
Round Face
Height flatters round faces by creating the illusion of length. Go for taller beehives to elongate your face. Keep sides sleek and close to the head. Avoid very wide beehives that add width. Side-swept bangs help create angles.
Square Face
Soft, rounded beehives soften angular jaw lines. Add side-swept bangs or leave some face-framing pieces to create curves. Avoid very structured, angular beehives that emphasize the square shape.
Heart Face
Heart-shaped faces have wider foreheads and narrow chins. Medium-height beehives work best. Make the beehive slightly wider to balance the narrow chin. Side-swept bangs help minimize a wide forehead.
Long Face
Long faces should avoid extremely tall beehives, which make the face appear even longer. Choose moderate height and add width to the beehive instead. Use bangs to shorten the appearance of the face. Consider half-up styles that leave some hair down.
Frequently Asked Questions About Beehive Hairstyles
How long does it take to create a beehive?
A basic beehive takes 20-40 minutes to create once you know the technique. More elaborate versions with braids, curls, or accessories can take 60-90 minutes. Your first attempts will take longer as you learn the technique.
Does the beehive damage your hair?
Backcombing creates temporary tangles but doesn’t cause permanent damage when done correctly. The key is removing the style gently with proper conditioning and detangling. Don’t create backcombed styles more than twice per week. Always use wide-tooth combs when removing teasing.
Can you sleep in a beehive?
Yes, a well-constructed beehive can last through sleeping. Wrap your hair loosely in a silk scarf and sleep on a satin pillowcase. Many people in the 1960s kept their beehives for several days by sleeping carefully and touching up with hairspray each morning.
What’s the secret to a tall beehive that stays up?
The combination of thorough backcombing, strong-hold hairspray, and proper pinning creates lasting height. Use plenty of bobby pins inserted diagonally and pushed upward. Hair that’s not freshly washed holds better than very clean hair. Consider using a hair pad or bump-it insert for extreme height.
Can you create a beehive on thin hair?
Yes, thin hair can still create beehives. Use volumizing products before styling. Backcomb more thoroughly at the roots. Consider using a beehive clip-in piece for added volume. Thin hair often holds backcombing well because the hair is lighter and easier to tease.
Why is my beehive falling flat?
Common causes include not enough backcombing, insufficient hairspray, or hair that’s too slippery from products or recent washing. Also check that you’re using enough bobby pins and inserting them correctly at upward angles.
Can you wash your hair with a beehive in?
No, you cannot wash your hair while keeping a beehive intact. The water, shampoo, and manipulation will completely destroy the style. When you’re ready to remove the beehive, apply conditioner to dry hair first, then gently work out the tangles before washing.
What’s the difference between high and low beehives?
High beehives are placed at the crown or top of the head and create dramatic height. Low beehives sit closer to the middle back of the head and are more subtle. High beehives are more formal and retro, while low beehives work better for casual or professional settings.
Do you need hair extensions for a beehive?
No, most people can create a beehive with their natural hair. Extensions help if you want extreme height and have short hair, or if you want added thickness. Extensions are most commonly used in braided beehive styles.
Can men wear beehive hairstyles?
Yes, anyone with enough hair length can create a beehive. Men with longer hair can absolutely rock this style. It’s particularly popular in drag, costume, and avant-garde fashion contexts.
Health and Safety Considerations
Scalp Health
Tight hairstyles and backcombing can stress the scalp. If you notice pain, redness, or irritation, loosen the style or remove it completely. Never pull so tightly that you feel discomfort. People with sensitive scalps or conditions like psoriasis or eczema should be extra gentle.
Traction Alopecia Risk
Repeated tension on hair follicles can cause traction alopecia, a type of hair loss. To prevent this, don’t create tight beehives more than a few times per week. Vary your hairstyles regularly. Give your hair breaks between styled periods. If you notice thinning or breakage, stop creating beehives and consult a dermatologist.
Product Buildup
Using heavy hairspray repeatedly without proper cleansing causes product buildup. This makes hair dull, heavy, and difficult to style. Use a clarifying shampoo once a week if you frequently create beehives. This removes buildup and restores hair’s natural texture.
Proper Removal Technique
Never rip through backcombed hair. This causes breakage and damage. Always apply conditioner or detangling spray to dry hair first. Work gently in small sections from ends to roots. Be patient. Proper removal takes 15-20 minutes.
When to Avoid Beehive Hairstyles
- Active scalp conditions: Open sores, severe dandruff, infections, or inflammation
- Recent chemical treatments: Wait at least one week after coloring, bleaching, or chemical straightening
- Very damaged hair: Extremely dry, brittle, or breaking hair needs recovery time first
- Hair loss conditions: Active alopecia or significant thinning
- Very humid weather: Unless you use professional-grade products, high humidity will collapse the style
Alternative Styles Similar to Beehives
If you love the beehive concept but want something different, consider these related styles:
The Bouffant
Softer and rounder than a beehive, with volume all around the crown rather than concentrated height. Easier to create and maintain. More suitable for everyday wear.
The Gibson Tuck
A vintage updo where hair is tucked and rolled under at the nape. Creates elegant height without extreme volume. Works beautifully for formal events and requires less backcombing.
The Pompadour
Volume swept back from the forehead and sides. Can be as dramatic or subtle as you want. Works for all genders and hair lengths.
The Victory Roll
Rolled sections at the front or sides of the head. Very 1940s style. Can stand alone or combine with other updos. Less structured than a beehive but still vintage.
The Top Knot with Volume
A modern bun at the crown with added height. Much quicker to create than a beehive. Works for casual and semi-formal occasions.
Conclusion
The return of retro hairstyles continues to make waves in fashion. The beehive offers a perfect blend of vintage glamour and modern style possibilities. This iconic 1960s look works for special events, themed parties, and even adapted versions for everyday wear.
Whether you choose a classic tall beehive or a modern messy variation, this style definitely turns heads and puts you in the spotlight. With practice, the right products, and proper technique, anyone can master this timeless hairstyle.
If you prefer a more contemporary style with less daily maintenance, you might also explore modern perm hairstyles that give you lasting volume without the daily styling effort.
For those who love natural, softer looks, consider trying other vintage-inspired options like the texture perm, which adds beautiful dimension without the extreme height of a beehive. Whatever style you choose, make sure it fits your personal taste, lifestyle needs, and comfort level.
| Photo | Popular Hair Product | Price |
|---|---|---|
|
|
Kkioor 24 Inch Chocolate Brown Human Hair Wig 200 Density Body Wave Lace Front Wigs Human Hair Pre Plucked 13X4 HD Frontal Wig 4# Colored Brown Wig For Women Glueless Wigs | Check Price On Amazon |
|
|
KingSup 613 Lace Front Wig Human Hair Pre Plucked 250 Density 26 Inch 5x5 HD Lace Closure Straight Blonde Wig Human Hair, 100% Real Human Hair without Synthetic Blend Tangle Free Triple Lifespan 3X | Check Price On Amazon |
|
|
WIGCHIC 16" Kinky Curly Half Wig Human Hair Burgundy & Dark Roots | Flip-Over Drawstring | Seamless 4C Hairline | True Length | 3-in-1 Styling | Beginner Friendly (T1B/99J) | Check Price On Amazon |
|
|
Hair Removal Cream for Men & Women: Painless Depilatory for Sensitive Skin & Intimate Areas, Moisturizing with Aloe Vera & Vitamin E, Safe for Face, Underarms, Bikini, Arms (3.7 Fl Oz (Pack of 2)) | Check Price On Amazon |
|
|
ZOOLY PROFESSIONAL Ginger Shampoo and Conditioner Sets 20.3 Fl Oz- Anti Hair Loss and Nourishes Hair Roots, Salon Level Scalp Care for Men and Women | Check Price On Amazon |
|
|
LUSN Baby Hair Clippers with Vacuum, Quiet Hair Trimmers for Kids, IPX7 Waterproof Rechargeable Cordless Haircut Kit for Baby Children Infant | Check Price On Amazon |
|
|
LURA Dual Voltage Travel Hair Dryer with Diffuser,Travel Blow Dryer Mini with EU Plug and UK Plug,Lightweight Portable Hairdryers with Folding Handle,1200W Compact Small Blowdryers for Women | Check Price On Amazon |
